Who likes playing telephone with time-sensitive materials? Nobody, that’s who. Instead, we’re going to look at the steps required to set your marketing or communications teams to log in to Hub Services and start sending rich Hub Services notifications. Ready to get started? Let’s dig in!
At this point in the process, I’ll assume you have Hub Services enabled. If not, look at my previous blog covering the essential setup.
Let’s talk moving parts here – in order for Role Based Access Control in Hub Services to function; it needs to be able to reference a Group from Workspace ONE Access. Let’s go ahead and set that part up!
Creating the AD Group From Active Directory Users & Computers
From Active Directory Users & Computers on domain-bound machine with permissions to create AD Groups
- From ADUC – Click the option for Create a Group in the Current Container

- Name your Group. In my example, I chose WS1_Notification_Senders

- Add your non-technical users to this group – this group will be entitled to send notifications via Hub Services.


Now let’s sync that group into Workspace ONE Access!
From Workspace ONE Access
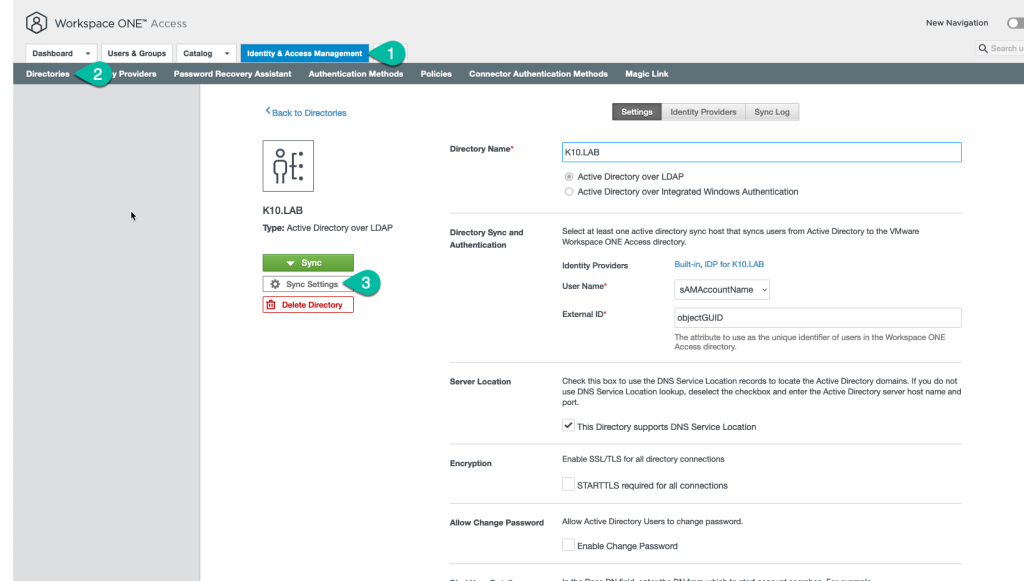
- Navigate to Identity & Access Management -> Directories -> (Your Directory Name)
- Choose Sync Settings

- Choose Groups
- Choose the Select Groups button

- Check the box next to your newly created group in AD. Previously, we created an AD Group called WS1_Notification_Senders and click Save

- Click Save again on the Groups tab to close the Sync Settings window
- Choose Sync (with Safeguards) and approve the sync if you have synchronization thresholds in place that may prevent the new group/users from being added to Workspace ONE Access, or simply Sync without Safeguards if you know there are no other pending changes that may impact your environment.

- From the Users & Groups tab, click the Groups option
- Click your newly synced group WS1_Notification_Senders
- Click on the Users tab and choose Sync Users


Creating the RBAC Role in Hub Services
From Workspace ONE Access
- In the top right corner of Workspace ONE Access (normal user portal) click your username/icon/initials. Choose Manage Hub Experience

- On the left menu, navigate to Admin Roles underneath the Admin Configurations section

- Click on the Roles option within the Admin Roles and observe that we have several pre-created RBAC roles. For our non-technical admins, we likely only want them to be able to CREATE notifications, so we’ll leverage the Notification Creator RBAC role for our new group.
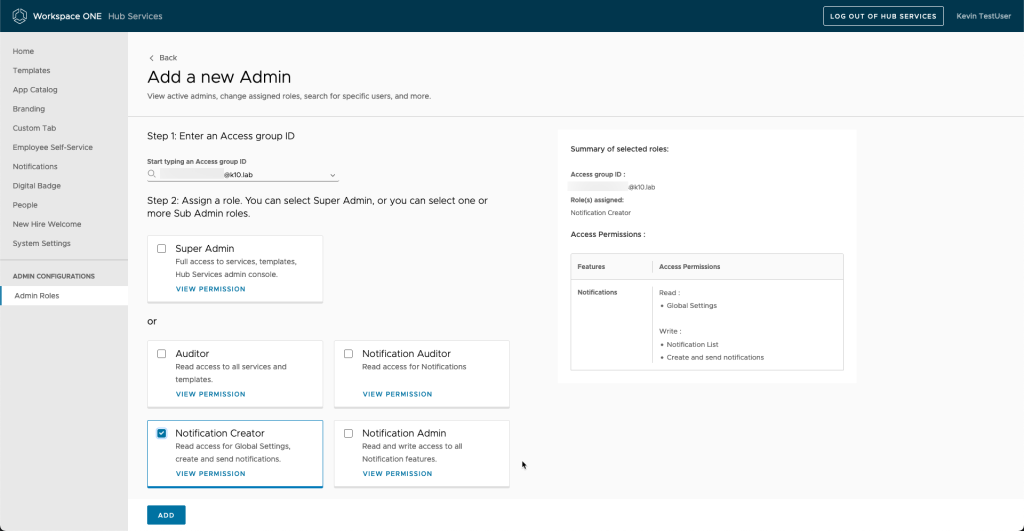
- Click back on the Admins tab click the Add New Admin button in the top right corner.

- Start typing the name of the group we just created, in my instance it’s [email protected]
- Check the box for Notification Creator and click Add

That’s it! You’ve successfully delegated permissions to a non-technical user to create Notifications from Hub Services. When your non-admin logs in, they’ll only see the Notifications tab and will only be able to create new Notifications. Let’s take a look at how that experience looks for our Marketing team!
Let’s pretend to be the Marketing Person!
Starting from a private browser session, let’s log in as Schmidt from our marketing team. Schmidt is definitely non-technical and shouldn’t be trusted with administrative rights.
Once logged in from the top right corner we’ll click on the user icon and choose Manage Hub Experience
Notice that Schmidt only sees the Notifications, and only has the option to create a new notification. If he tries to click on the Global Settings for Notifications, all those options are read-only.
Hopefully this was helpful as you enable others within your organizations to leverage the awesomeness of Hub Notifications and Hub Services overall!